Sonoff Basic

I found this cheap smart WiFi switch on one of my favourite Chinese sites: the Sonoff Basic:

Sonoff Basic

Sonoff Basic

And I thought: for a fiver, I’m not risking much, and it can supposedly be re-flashed with MQTT which I’ve grown found of recently (see Smart Christmas Baubles or Back-lit House Number if you want to know why).

Once received, I saw that indeed there was a header that could be used to flash the firmware. After a bit of search and from some of my readings on the Home-Assistant community site, I settled on the Tasmota firmware.

Now I have to say, at first the Tasmota Github website is quite daunting and complex, bit of a case of too much information kills information, but I eventually managed to get through it.

As I’m using Arduino IDE, I’ll trace the steps I had to follow in case someone else like me is a bit stuck.

First of all, I had to solder header pins on the Sonoff board to connect it to a PC and upload the new firmware. You’ll find everything you need to know in here

Then there were a few things that I had to do aside from downloading the code off Github. Now I have to plea guilty a bit as I simply downloaded the latest version and tried straight away. I say “guilty a bit” as it wasn’t obvious at first that there were more steps to follow when using Arduino IDE. So it’s worth following them else you may get the same error as I did: `MQTT_MAX_PACKET_SIZE is too small in libraries/PubSubClient/src/PubSubClient.h, increase it to at least 1000`

So here is the info: Arduino IDE

Once all that is done, flashing is a bit of a breeze (though I had to swap the RX and TX connectors on my 3.3V FTDI USB-to-Serial Programmer else it would fail to connect)

Once flashed, it was very easy to add it to Home-Assistant, especially when following info from the Github

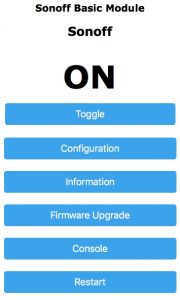
Best of all is the control page when browsing to the Sonoff’s IP address:

Tasmota

Tasmota

I will definitely get more of these switches at this price.

My next project will be to add a DHT12 to it as it’s possible to wire one directly to the GPIO14 (on the header so easy) to add temperature and humidity data…



Xiaomi Dafang Camera

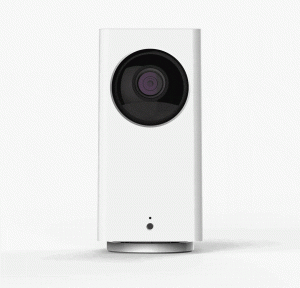
I’ve recently purchased a Xiaomi Dafang Camera from GearBest. Why? Well it was cheap, 1080p resolution and has Pan-Tilt functionality as well as audio recording.

Xiaomi Dafang

Xiaomi Dafang

A couple of let downs however:

  1. The camera did not offer any RTSP streaming functionality (so not possible to use motion)
  2. The camera uploads the video feed to some server in China for the Xiaomi Mi app to retrieve

Not happy with either of the above, I started to look around for a solution and Elias Kotlyar managed to hack it to provide exactly what I was after.

I now have a camera that behaves like a “normal” CCTV camera via motion. I’ve also created a switch in Home-Assistant so as to enable motion detection video recording only when nobody’s home. Check my github page for more details.

In addition to the aforementioned standard features, Elias offered manual control of the LED so I can use this as a quick way of showing the camera status (on, off, motion recording enabled) My short term goal is to add MQTT to the camera to make it easier to control the LED and potentially the motors to pan & tilt. Longer term goal would be to get motion to control the pan-tilt functionality automatically. But that is likely to be a much more complex problem to solve, especially since motion documented that feature as “permanently at the experimental stage“…

The camera is however so good and cheap that I already bought another one 🙂

Watch this space…


Smart Christmas Baubles

Thanks to Gosse Adema and his instructable, I’ve also created smart Christmas baubles.

I currently have 3 baubles that I’ve connected to Home-Assistant, and I made some amendments to Gosse’s code to add MQTT Support (inspiration and code taken from corbanmailloux.)

You can get a copy of my code on my github page.

Here are some pics of my baubles:

Bauble1

Bauble1

Bauble2

Bauble2

Bauble3

Bauble3

Merry Christmas 🙂


Back-lit House Number

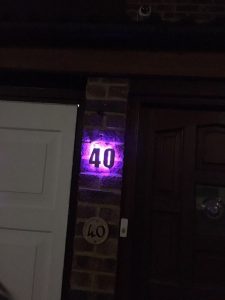
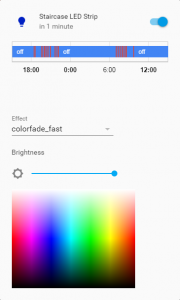
After the TV cabinet and the staircase, I got a new house number an LED treatment. Using the same H801, I glued a small piece of LED strip on the back of each number and set it in Home-Assistant to come up at dusk and switch off at midnight. I also set the colour to change through the colour spectrum so it’s less boring ?

LED House Number

LED House Number

Since the picture was taken I’ve removed the “old” number 40 beside the doorbell…


CurrentCost Script

Until now I used DomotiGa to get the date off my CurrentCost EnviR energy sensor.

Since I’ve moved all my automations to Home-Assistant, the only bit that was not supported by HA was the CurrentCost device. I didn’t want to run DomotiGa just to get the data off the EnviR and then send it to HA via MQTT.

I’ve finally finished a script thanks to Robin Wilson that gets the EnviR data from the serial port and sends it to HA. DomotiGa can now truly rest in peace.

The final script is this one:

#!/usr/bin/python
# -*- coding: utf-8 -*-

import untangle
import serial
import json, requests, simplejson

def get_data(port='/dev/ttyUSB1', verbose=False):
	"""port: the port that the CurrentCost meter is attached to. Something like /dev/ttyUSB0 or COM1
	Returns:
	(sensor, temperature, usage), with sensor as the number of the interface a device is assigned to, temperature in degrees C, and usage in Watts
	"""
	ser = serial.Serial(port, 57600)
	xmldata = ser.readline()
	if verbose:
		print(xmldata)
	ser.close()
	p = untangle.parse(xmldata)
	temperature = float(p.msg.tmpr.cdata)
	watts = int(p.msg.ch1.watts.cdata)
	sensor = int(p.msg.sensor.cdata)
	return [sensor, watts, temperature]

def HA_API_State(Device_Id, Value, Unit):
	#https://home-assistant.io/developers/rest_api/#post-apistatesltentity_id
	url = "http://192.168.0.24:8123/api/states/" + str(Device_Id) + "?api_password=SECRET" 
	data={"state":"" + str(Value) + "", "attributes": {"unit_of_measurement": "" + str(Unit) + ""}}
	headers = {'Content-type':'application/json', 'Accept-Encoding': 'text/plain', 'Accept': 'text/plain'}
	r = requests.post(url, data=json.dumps(data), headers=headers)
	c = r.content
	result = simplejson.loads(c)

Temperature = 0
Sky = 0
Dehumidifier = 0
Total = 0

while(True):
	try:
		Temp = get_data()
		#print Temp[0]
		if (Temperature <> Temp[2]):
			print "Temperature: %s" % Temp[2]
			Temperature = Temp[2]
			HASS_API_State("sensor.CurrentCost_Temperature", Temperature, "°C")
		if (Temp[0] == 1):
			if (Total <> Temp[1]):
				print "Total: %s" % Temp[1]
				Total = Temp[1]
				HASS_API_State("sensor.CurrentCost_Power", Total, "Wh")
		if (Temp[0] == 2):
			if (Dehumidifier <> Temp[1]):
				print "Dehumidifier: %s" % Temp[1]
				Dehumidifier = Temp[1]
				HASS_API_State("sensor.Dehumidifier_Power", Dehumidifier, "Wh")
		if [Temp[0] == "9"]:
			if (Sky <> Temp[1]):
				print "Sky: %s" % Temp[1]
				Sky = Temp[1]
				HASS_API_State("sensor.CurrentCost_Sky", Sky, "Wh")
			
	except:
		pass


H801 LED Strip Controller Upgrade

While I’m perfectly happy with the H801 LED Strip controller’s abilities, there were a few niggles that I didn’t like:

  • The controller would always advertise as an access point, allowing “anyone” to connect as long as they knew the default SSID password (88888888)
  • Communication is 1 way with no feedback
  • The script I wrote to go through the colour spectrum was ran off the server and basically sending a command to the H801 over the WiFi network every 0.1 sec
  • I had to create an on/off switch as well as 3 sliders to select the (RGB) LED colour

Knowing the H801 is based on the ESP8266 chip and programmable, I looked for a better solution and finally settled on corbanmailloux solution for the following reasons:

  • The H801 is no longer an access point, making it more difficult to hack
  • it’s MQTT “enabled” and offers 2 way communication
  • It’s Home-Assistant compatible, and already includes support for RGB attributes via a colour picker and other effects
  • It already has the function to loop through the colour spectrum; actually it has 2 of them at different speeds, plus the possibility to time colour transitions and a flash feature, for notifications for example
MQTT JSON Light on Home-Assistant

MQTT JSON Light on Home-Assistant

I used the code off the mqtt_esp8266_rgb folder. The only things I had to change in config.h were:

  • LED colour pins to be compatible with the H801:
    #define CONFIG_PIN_RED 15
    #define CONFIG_PIN_GREEN 13
    #define CONFIG_PIN_BLUE 12
  • change the WiFi settings and the MQTT settings

Because I use cloudmqtt, I also changed the MQTT port in the main `mqtt_esp8266_rgb.ino` file:

client.setServer(mqtt_server, 16306);

I followed the instructions on corbanmailloux git page to install Arduino and the relevant libraries, and I used the esptool from micropython to upload the firmware


Goodbye DomotiGa, Long Live Home-Assistant

Following what I think is due to a general OS update, SmartVISU no longer connects to DomotiGa. I’ve tried to fix it, but I’ve thought for a while now to transfer everything over to Home-Assistant since support for IoT devices is much better and update are a lot more frequent

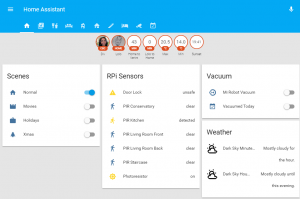
So I’ve finally taken the plunge. One of the main hubs that was used in DomotiGa was the RFXTrx433 Transceiver. I’ve disconnected it from DomotiGa and added it to Home-Assistant. I’ve spend the best part of 2 weekends and several weekday evenings recreating the devices and events that were in DomotiGa.

Home-Assistant Main Page

Home-Assistant Main Page

There’s still a lot of work to be done, but I’ve done the most important bits. I’ve also broken down the content on several pages unlike cramming almost everything in one page like I did in SmartVISU.

I’ve also used this an opportunity to save my config to GitHub for back up and in case it helps someone else.

The only thing I’ll be missing as not built-in is the data from my CurrentCost Sensors, but I’ll be running a light version of DomotiGa to send that data to my Home-Assistant setup.


Kello Smart Alarm Clock, Part 2

I’ve now had enough time to play with my Kello and I’ve done enough integrations to share some updates.

Now Kello doesn’t have an API per se, but there are a few commands that can be used to communicate with it.

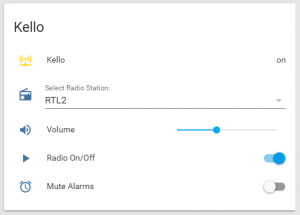
This enabled me to created a Kello interface on Home-Assistant so I can control my Kello remotely. Bonus: I can even do this when I’m not home.

The main interface is this one:

And here are some of the functions that I’ve achieved:

  • When I stop the alarm, I then get greeted with the weather forecast for the day as well as estimated time to go to work
  • I can play various radio stations, change the volume
  • If for any reason the Kello loses WiFi connection, I get a notification email
  • When I leave home, or when I set the house mode to “Holidays”, all alarms get deactivated
  • When I reach home or when the house mode is no longer set to “Holidays”, all alarms are enabled


Here is a list of the commands I used to achieve the above:

Volume:

printf "\n0p40xx\r" | nc [Kello's IP Address] 4444

Where xx is the volume in hex (Dec from 0 to 100, so 0x00 to 0x64 in hex)


Muting all Alarms:

printf "\n0p231\r" | nc [Kello's IP Address] 4444


Unmuting all Alarms:

printf "\n0d231\r" | nc [Kello's IP Address] 4444


Play (online) Media:

printf "\n0p41uri:http\:\/\/cdn.us1.sunup.co\/files\/music\/sounds\/fireside.ogg\r" | nc [Kello's IP Address] 4444


Stop Media:

printf "\n0d41\r" | nc [Kello's IP Address] 4444


And don’t forget the IFTTT Integration for more automation, check my previous post on how do to this.


Xiaomi Mi Robot Vacuum

I have finally purchased a robotic vacuum cleaner. After much time trying to get the best smart / connected automated vacuum cleaner for my money, I opted for the Xiaomi Mi Robot Vacuum.

Xiaomi Mi Robot Vacuum

Xiaomi Mi Robot Vacuum

I have to say it’s excellent at navigating through the house in each and every nook it can get into, yet not once has it got stuck somewhere.

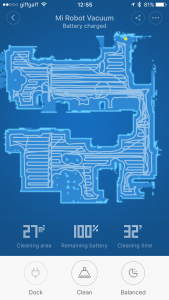
And the app is pretty good in telling you what the vacuum has done as well as sending you notifications (if you want) each time something happens (e.g. start cleaning, completed, main brush stuck, etc.)

Xiaomi Cleaning House Map

Xiaomi Cleaning House Map

The best part though is that in addition to controlling the vacuum from the Xiaomi app, it can also be integrated into Home-Assistant:

Xiaomi on Home-Assistant

Xiaomi on Home-Assistant

Clicking the button will simply start vacuuming.

I then created a simple automation to initiate the cleaning on specific days/time IF I’m not home.

If only I could also automate emptying the vacuum bin…


Kello Smart Alarm Clock

I have recently taken the plunge and jumped on the kickstarter wagon for the first time.
I successfully backed up a project called Kello.
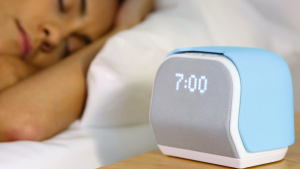
And after months of anticipation, I finally received the product: a smart alarm clock:

Kello

Kello

Now not only does this alarm look good, but it’s also WiFi and IFTTT enabled and for me that was the major sales point. The plan was to integrate it with my automation setup.

I’ve only had it for about a month and already I’m really impressed with its prowess. The first thing I did was to connect it to IFTTT.

At the time of writing IFTTT is only a beta feature access needs to be requested ([email protected]). They are really responsive and I was granted access within 24h via the use of the TestFlight app on iOS

IFTTT integration currently offers 4 triggers:

  • alarm_start: triggers when an alarm starts ringing.
  • alarm_snooze: triggers when you press snooze.
  • alarm_stop: triggers when you stop the alarm.
  • alarm_soon_-1440, ..., alarm_soon_-120, alarm_soon_-6: the number on the right is the number of seconds before the alarm rings. Only use multiples of 60, up to 1440 seconds (24 minutes) before the alarm rings.

The other interesting bit is that the device can programatically be made to play online content with a one line piece of code:

printf "\n0p41uri:http\:\/\/cdn.us1.sunup.co\/files\/music\/sounds\/fireside.ogg\r" | nc 192.168.x.x 4444

The URL can be adjusted to play any online content (I’ve not tested all formats). The IP address needs to be the Kello’s IP address (best to set it to static on your router’s DHCP settings)

Armed with the above, I wanted to adjust my weather greeting script so as to play the audio on the Kello. The idea is to have the Kello play its set alarm sound to wake me up, then when I stop the alarm, a rule is triggered to play the weather forecast for the day (I pressed the stop button so I’m awake enough to pay attention to the forecast)

Here is how I did it.

  1. IFTTT:
    1. Go to http://www.ifttt.com/maker_webhooks.
    2. Press on the gear icon on the top right of your screen.
    3. Copy your webhook ID (the text after ‘http://make.ifttt.com/use/’).
  2. Home Assistant:
    1. Add the IFTTT integration to your configuration:
    2. Don’t forget to copy/save your webhook URL, you’ll need this later
    3. Add a new shell command to your configuration.yaml file. Replace the IP with your Kello’s IP address and replace the URL with the address of the weather forecast sound file you want to play (this is created and uploaded separately)
      shell_command:
      weather_on_kello: printf "\n0p41uri:http\:\/\/cdn.us1.sunup.co\/files\/music\/sounds\/fireside.ogg\r" | nc 192.168.x.x 4444
  3. Kello App:
    1. Go to the settings.
    2. Press ‘IFTTT’.
    3. Paste your webhook ID.
  4.  IFTTT:
    1. Create a new Applet.
    2. For the if THIS condition, choose Webhooks.
    3. Click on Receive a web request
    4. For the Event Name, choose one of the event as listed earlier on. I chose alarm_stop
    5. Click on Create trigger
    6. For the then THAT action, choose Webhooks.
    7. Click on Make a web request
    8. Enter the following details:
      1. URL: your Home Assistant IFTTT Webhook (you will get this when you setup the IFTTT Integration in HA, see 2.1 above)
      2. Method: POST
      3. Content Type: application/json
      4. Body: { “action”: “somekeywordgoeshere”}
    9. Click on Create action
  5. Home Assistant Automation:
    1. Create a new automation. The needed trigger will be:
  trigger:
    - platform: event
      event_type: ifttt_webhook_received
      event_data:
        action: somekeywordgoeshere

(*): To be able to receive events from IFTTT, your Home Assistant instance needs to be accessible from the web. This can be achieved by forwarding port 8123 from your router to the device running Home Assistant.

My next “project” is to mute or stop an alarm from playing if for any reason I’m not home so I don’t disturb anyone. Check this post to see how I did it